Valencia City Water District · DocuManage
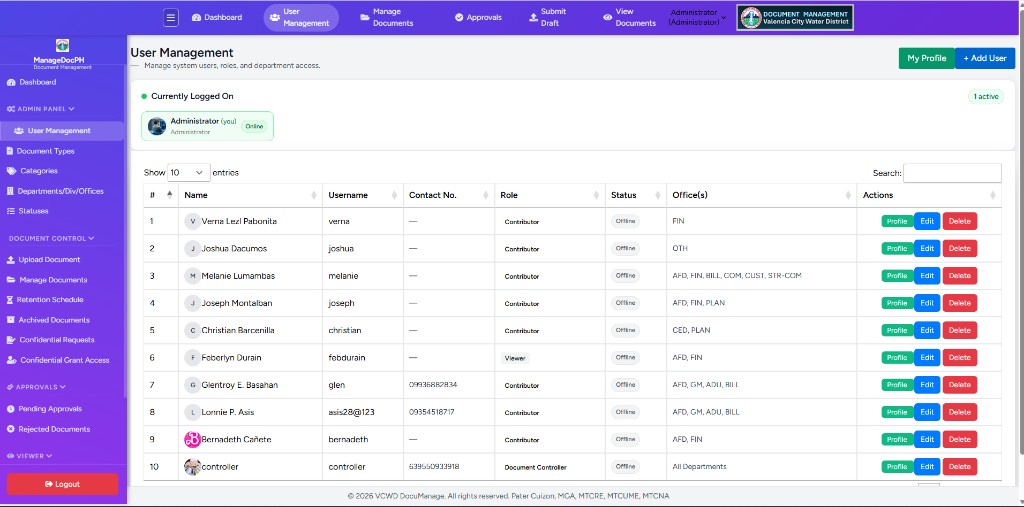
User Management
Resume: use section numbers in the left menu1. Purpose
The User Management module lets administrators:
- Create and maintain login accounts for VCWD staff
- Assign roles (which modules each person can use)
- Set office/department access (which documents they can see)
- View who is currently logged on
- Open a user’s Profile (photo, departments, CRUD permissions)
- Edit or delete accounts
On-screen subtitle: Manage system users, roles, and department access.
2. How to open User Management
- Sign in as Administrator.
- In the left sidebar, expand Admin Panel.
- Click User Management.
Alternate: Top navigation bar → User Management.
3. Screen layout
3.1 Page header
| Element | Description |
|---|---|
| User Management | Page title |
| My Profile (green) | Opens your profile (Profile guide) |
| + Add User (blue) | Opens Add User dialog (§5.1, Figure 2) |
3.2 Currently Logged On
Active login sessions. Green pulse + N active badge. Each chip shows avatar, name, role, Online. Your chip shows (you).
3.3 Users table
DataTables controls: Show N entries (default 10), Search, sortable columns, pagination.
3.4 Table columns
| Column | Description |
|---|---|
| # | Row number |
| Name | Avatar + full name |
| Username | Login ID |
| Contact No. | SMS number or — |
| Role | Color badge (Administrator, Document Controller, etc.) |
| Status | Online (green) / Offline (gray) |
| Office(s) | Department codes or All Departments |
| Actions | Profile · Edit · Delete |
4. User roles
| Role | Typical use | Office(s) |
|---|---|---|
| Administrator | Full system control | All Departments |
| Document Controller | Records, movements | All Departments |
| Approver | Approve / reject | Codes if restricted |
| Contributor | Upload in assigned offices | FIN, BILL, … |
| Viewer | Read-only | Department codes |
5. Procedures
5.1 Add a new user
- On User Management, click + Add User (blue, top right).
- The Add User dialog opens (see Figure 2).
- Complete Account details and Login credentials as described below.
- Click Save user.
- On success, the new account appears in the table and can log in.
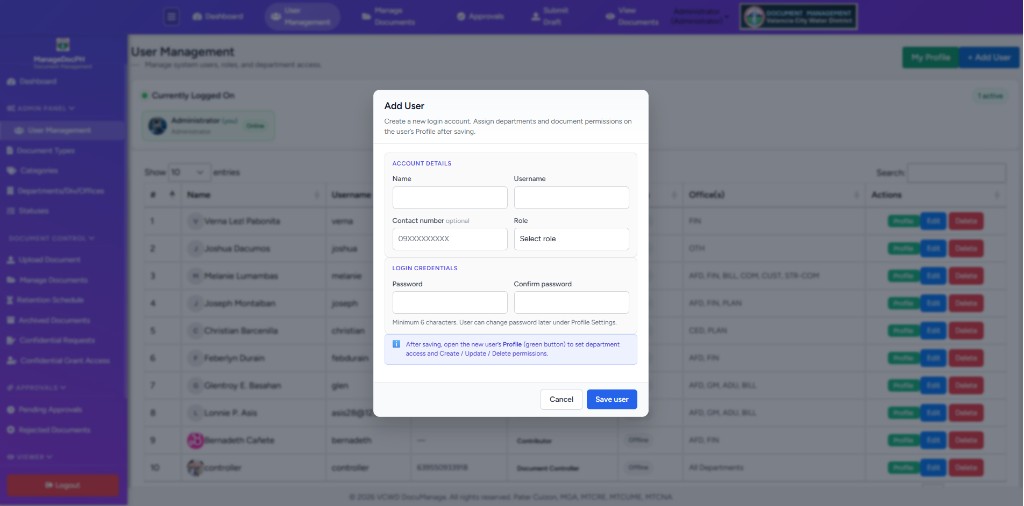
Subtitle on the dialog: Create a new login account. Assign departments and document permissions on the user’s Profile after saving.
Account details
| Field | Required | Description |
|---|---|---|
| Name | Yes | Full name shown in lists, movements, and approvals |
| Username | Yes | Unique login ID (stored lowercase) |
| Contact number | No | Mobile for SMS alerts (e.g. 09XXXXXXXXX) |
| Role | Yes | Administrator, Document Controller, Approver, Contributor, or Viewer |
Login credentials
| Field | Required | Description |
|---|---|---|
| Password | Yes | Minimum 6 characters |
| Confirm password | Yes | Must match Password |
Hint under the fields: Minimum 6 characters. User can change password later under Profile Settings.
After creating Contributor, Viewer, or Approver: click row Profile → System Access tabs (see Profile Settings manual).
Cancel closes the dialog without saving. Click outside the dialog or press Esc to close.
5.2 Edit a user (quick)
Opens the Edit User dialog — same layout as Add User (Account details + Login credentials).
- Click Edit (blue) on the row.
- Update name, username, contact number, or role.
- Password: leave both password fields blank to keep the current password; fill them only to reset.
- Click Save changes.
For photo, departments, and CRUD: use Profile (Section 5.3).
5.3 Open user Profile (full settings)
- Click Profile (green) on the row.
- Configure photo, departments, CRUD permissions, Can view all departments.
- Save — details in Profile Settings manual.
5.4 Delete a user
- Click Delete (red).
- Confirm This action cannot be undone!
- Click Yes, delete it!
5.5 Search the table
Use the Search box or increase Show entries.
6. Action buttons
| Button | Color | Function |
|---|---|---|
| My Profile | Green (header) | Your own profile |
| + Add User | Blue | New account |
| Profile | Green (row) | Full user profile page |
| Edit | Blue | Quick edit modal |
| Delete | Red | Remove user |
7. Office(s) column
| Display | Meaning |
|---|---|
| All Departments | Administrator / Document Controller |
| FIN, OTH, AFD… | Allowed department codes |
| — | No departments — configure via Profile |
8. Troubleshooting
| Situation | What to do |
|---|---|
| Cannot see User Management | Not an Administrator |
| Username taken | Choose another username |
| User sees no documents | Profile → assign departments |
| Delete fails on own row | Use another admin account |
9. Security reminders
- One account per person — do not share logins
- Use minimum role required
- Remove accounts when staff leave
- Review Currently Logged On periodically