Valencia City Water District · DocuManage
Upload Document
Resume: §6 Storage location · §8 Mobile tips1. Purpose
Register a new document in DocuManage: code, title, type, category, department, optional storage location, description, and file attachments.
New uploads may go to Pending Approval depending on system settings.
2. How to open
- Sign in with a role that can upload (Administrator, Document Controller, or Contributor).
- Sidebar → Document Control → Upload Document.
- Or top bar → Submit Draft (Contributor) when shown.
URL: /documents/create
3. Single-page form (no tabs)
The upload screen is one continuous form — not divided into tabs. Scroll from top to bottom on any device:
- Document details (code, title)
- Classification (type, category, department)
- Storage location (optional)
- Additional information (description, pages, issue date)
- Files (main file and attachments)
- Save & Upload
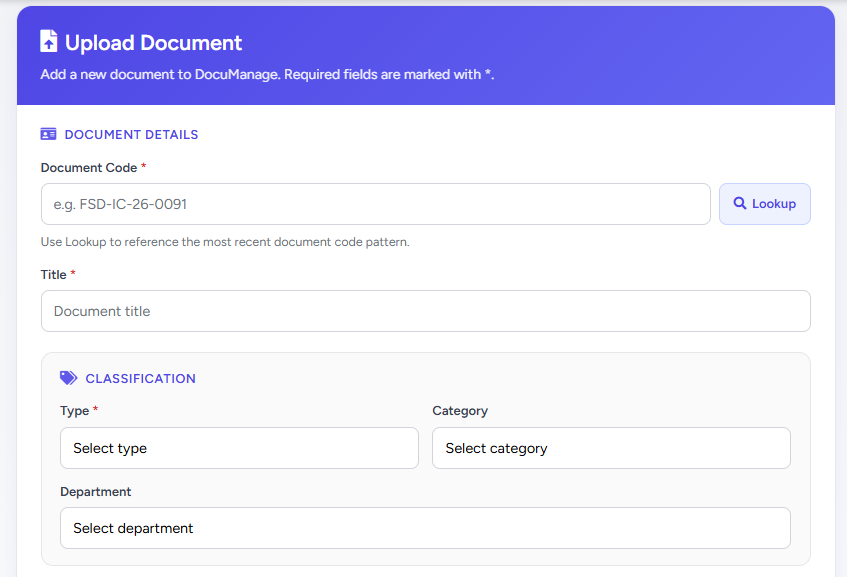
4. Document details
| Field | Description |
|---|---|
| Document Code * | Unique code (e.g. FSD-IC-26-0091). Use Lookup beside the field to see the last uploaded code pattern. |
| Title * | Clear document title |
Lookup: Opens a small dialog with the previous document code and description. Click Use this code to copy the code into the field (edit as needed).
5. Classification
Shown in the same view as Figure 1 (gray Classification box).
| Field | Required | Description |
|---|---|---|
| Type | Yes | Document type from admin list |
| Category | No | Category when applicable |
| Department | No | Owning office — must be one you are allowed to use |
Configure types, categories, and departments under Admin Panel before uploading (04, 05, 06).
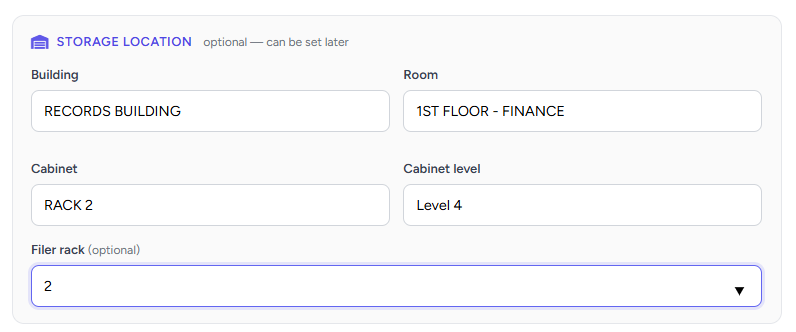
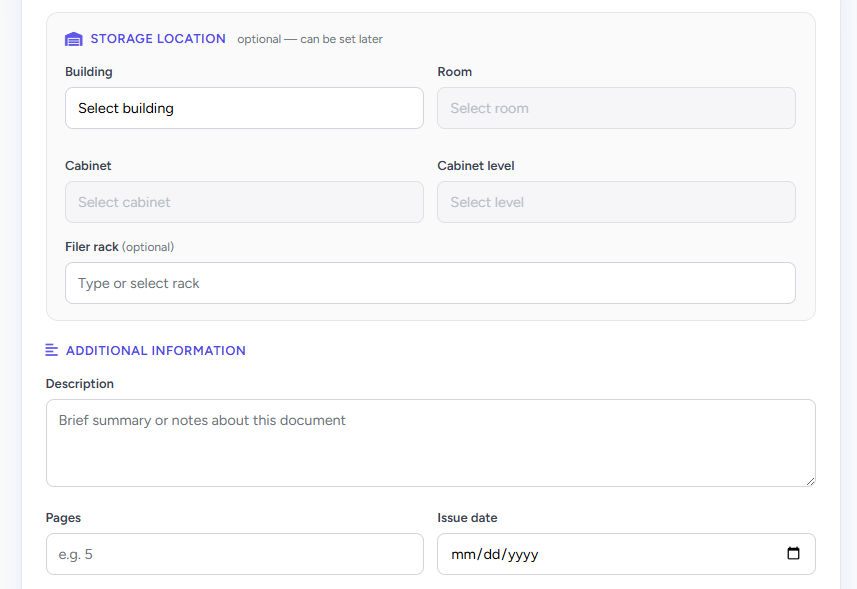
6. Storage location & additional information
The gray Storage Location panel records where the physical record is kept in the office (building, room, cabinet, and so on). The form labels it optional — can be set later, but VCWD encourages you to complete it whenever a paper file or boxed record exists — the same day you upload if possible.
6.1 Why complete storage location?
- A physical copy is filed in Records, Finance, or another office
- Staff must retrieve the folder for audit, billing, or legal requests
- You want the document to appear under With Location on the Dashboard (not No Location)
- Document Movements or handoffs need a clear “where it lives now”
Accurate storage data helps Document Control, auditors, and your own department find paper in minutes instead of searching every rack. Incomplete location is a common reason records show as No Location on management reports.
| Benefit | How DocuManage uses it |
|---|---|
| Find physical files | Building → Room → Cabinet → Level → Filer rack pinpoints the shelf or rack |
| Dashboard KPIs | With Location vs No Location counts reflect completed storage fields |
| Accountability | Others can trust the system when retrieving or moving originals |
| Less rework | Filling at upload avoids backlogs of “location unknown” documents |
6.2 When to fill now vs later
| Situation | Recommendation |
|---|---|
| Paper already filed in Records / office rack | Complete now during upload |
| Digital-only; no physical file | May leave blank or set logical/physical N/A per office policy (edit later if needed) |
| Physical file not yet shelved | Upload metadata and files first; edit the document the same day once shelved |
| Unsure of exact rack | Ask Records or Document Control for the correct building/room/cabinet before saving |
6.3 Storage fields — step by step
Fields unlock in order. You must select each level before the next dropdown or list becomes active.
| Field | Required for location? | Description |
|---|---|---|
| Building | Yes (first step) | e.g. RECORDS BUILDING — main site where files are stored |
| Room | Yes | e.g. 1ST FLOOR - FINANCE — floor or office area (enabled after Building) |
| Cabinet | Yes | e.g. RACK 2 — cabinet, rack, or bay (enabled after Room) |
| Cabinet level | Yes | e.g. Level 4 — shelf or tier within the cabinet (enabled after Cabinet) |
| Filer rack | Optional | Specific slot or filer number when your office uses rack subdivisions (enabled after Level) |
- Select Building from the list.
- Select Room (only rooms for that building appear).
- Select Cabinet, then Cabinet level.
- If applicable, choose or type Filer rack (e.g. 2).
- Double-check labels match the physical label on the folder or box before you click Save & Upload.
6.4 If you must skip temporarily
You may upload without storage location when policy allows (e.g. draft digital-only). In that case:
- Add a note in Description if filing is pending (e.g. “Awaiting shelving – Records”).
- Assign a responsible person to update location in Manage Documents → Edit once the file is shelved.
- Expect the document to count toward No Location on the Dashboard until completed.
6.5 Additional information
Below the storage panel on the same screen:
- Description — summary, retention notes, or “filed under …” if helpful to searchers
- Pages — page count of the physical or PDF bundle
- Issue date — official date on the document (use the date picker where shown)
7. Files & submit

| Control | Description |
|---|---|
| Main file | Optional primary file. Tap Main file to choose from your device. |
| Attachments | One or more supporting files (multiple selection where supported). |
| Back to Manage Documents | Cancel and return to the document list without saving. |
| Save & Upload | Submits the form. Wait for confirmation before closing the browser. |
If no main file is chosen, the first attachment may be treated as the main file.
8. Phone, tablet & PC tips
| Device | Tips |
|---|---|
| Mobile phone | Scroll through all sections; fields stack vertically. Save & Upload stays at the bottom for easy tapping. Use your gallery or files app when picking attachments. |
| Tablet | Same single-page form; more width may show two columns for Type/Category on landscape. |
| Desktop / laptop | Full layout with side-by-side fields where space allows. Keyboard Tab moves between fields. |
9. After upload
- Find the record under Manage Documents or the Dashboard Documents Overview.
- Approvers see it under Pending Approvals when status is pending.
- If storage was skipped, open Edit and complete Storage Location as soon as the paper is shelved — do not leave No Location longer than necessary.