Valencia City Water District · DocuManage
Manage Documents
Resume: §6.1 Location modal · §9 Edit Document1. Purpose
Manage Documents is the main working list for document records. Use it to:
- Search and filter by title, code, type, and category
- Review status, location, and attachments
- View, edit, update location, archive, and manage files
- Jump to Upload Document or (Administrator) the Confidential Page
What you can do on each row depends on your role and the document’s status.
2. How to open
- Sign in with a role that can manage documents.
- Sidebar → Document Control → Manage Documents.
- Or top navigation bar → Manage Documents.
URL: /documents
3. Screen layout
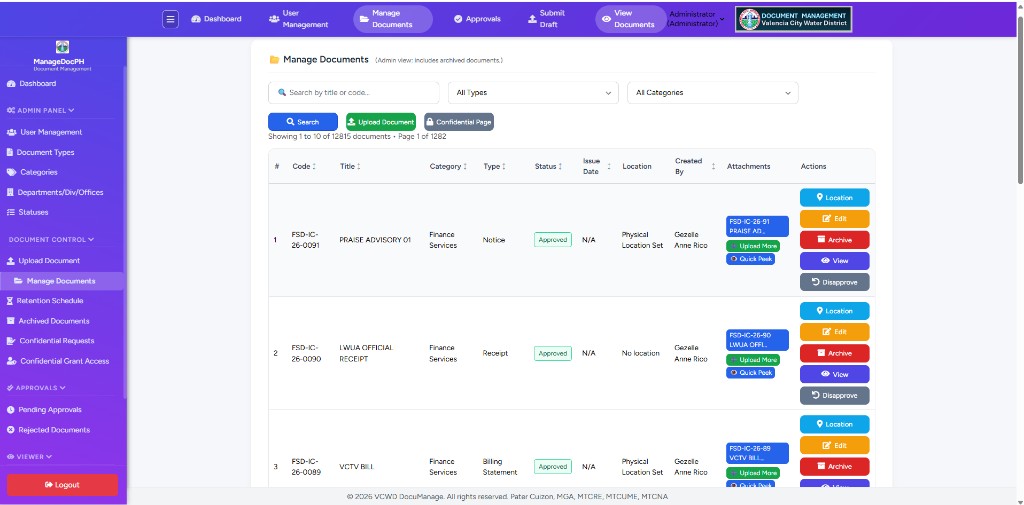
| Area | Description |
|---|---|
| Page title | Manage Documents — Administrators may see (Admin view: includes archived documents.) |
| Search bar | Search, type/category filters, action buttons (§4) |
| Page info | e.g. Showing 1 to 10 of 12815 documents · Page 1 of 1282 |
| Table | Sortable columns and per-row actions (§5–§8) |
4. Search & filters
| Control | Action |
|---|---|
| Search by title or code | Text box — partial match on title or document code |
| All Types | Dropdown — limit to one document type |
| All Categories | Dropdown — limit to one category |
| Search (blue) | Apply filters and refresh the table |
| Upload Document (green) | Opens upload form — see Module 08 |
| Confidential Page (gray) | Administrator only — opens §12 Confidential documents |
Click a column header (Code, Title, Category, Type, Status, Issue Date, Created By) to sort; click again to reverse order.
5. Document table columns
| Column | Description |
|---|---|
| # | Row number on the current page |
| Code | Document code; archived rows show an ARCHIVED badge |
| Title | Document title |
| Category | Category name (e.g. Finance Services) |
| Type | Document type (e.g. Notice, Receipt) |
| Status | Colored badge — Approved (green), Pending Approval (yellow), Rejected (red), etc. |
| Issue Date | Issue date or N/A |
| Location | Physical Location Set, logical location name, or No location — see §6 |
| Created By | User who uploaded the record |
| Attachments | File pills, Upload More, Quick Peek — see §7 |
| Actions | Stacked buttons per row — see §8 |
6. Location column & Location button
The Location column shows whether storage has been recorded:
| Display | Meaning |
|---|---|
| Physical Location Set | Building, room, cabinet, level, and/or filer rack is on file |
| Logical location name | May show a named logical location when configured |
| No location | Physical/logical storage not completed — update when paper is shelved |
6.1 Location modal (from Actions button)
Click the light blue Location button in the Actions column for any row. A modal opens over the list so you can read storage details without leaving Manage Documents.
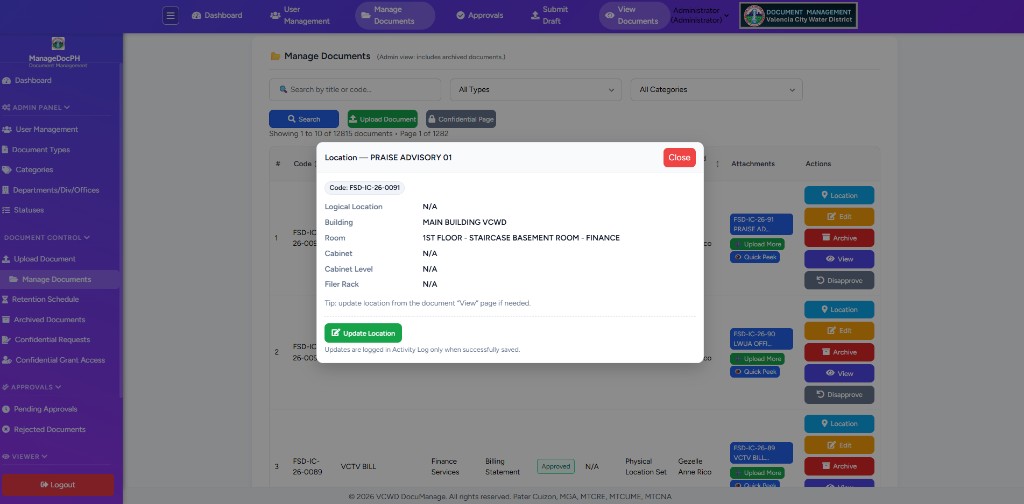
How to open and close
- On Manage Documents, find the document row.
- Click Location (light blue, map-marker icon) in Actions.
- Review the modal title: Location — [document title].
- Click red Close, click outside the modal, or press Esc to dismiss.
What the modal shows
| Element | Description |
|---|---|
| Title bar | Location — plus the document Title |
| Code badge | Document code (e.g. Code: FSD-IC-26-0091) |
| Logical Location | Department/office used as logical storage, or N/A / No location indicated |
| Building | Physical building name (e.g. MAIN BUILDING VCWD) |
| Room | Room or area (e.g. 1ST FLOOR - STAIRCASE BASEMENT ROOM - FINANCE) |
| Cabinet | Cabinet or rack identifier |
| Cabinet Level | Shelf level (1–10 when set) |
| Filer Rack | Optional filer slot number |
| Tip | update location from the document “View” page if needed |
Update Location (Administrator & Document Controller)
Users with update rights see a green Update Location button below the read-only grid.
- Click Update Location to expand the edit panel.
- Update Logical Location — choose Department/Div/Office from the list, optional remarks, then Save Logical Location.
- Update Physical Location — select Building, Room, Cabinet, enter Cabinet Level (1–10), optional Filer Rack and remarks, then Save Physical Location.
- After a successful save, the list and modal reflect the new values; the Location column should no longer show No location when physical data is complete.
Updates are logged in Activity Log only when successfully saved.
Alternative: open View (purple) or Edit (orange, Administrator) for the same document to change metadata and storage on the detail/edit screens.
7. Attachments column
- Blue pills — attachment file names (shortened if long)
- Upload More (green) — add more files on the document detail page
- Quick Peek (blue) — preview the main file in a popup viewer when available
8. Row actions (Actions column)
Buttons appear based on role, status, and whether the document is archived.
| Button | Color | Who / when |
|---|---|---|
| Location | Light blue | View/update storage location |
| Edit | Orange | Administrator, active (non-archived) documents |
| Archive | Red | Administrator — see archive confirmation below |
| Restore | Gray | Administrator — on archived rows only |
| View | Purple | Opens Document Details — see §8.2 |
| Disapprove | Gray | Approved documents — Administrator or creator; see §8.4 |
Edit opens the compact edit form — see §9. Confirm dialogs appear for Archive, Restore, and Disapprove.
8.2 View button — Document Details
On Manage Documents, click the purple View button in the Actions column for any row you are allowed to open.
- Find the document in the table (use Search if needed).
- Click View (purple, eye icon).
- The Document Details page opens (
/documents/{id}). - When finished, click ← Back to return to Manage Documents.
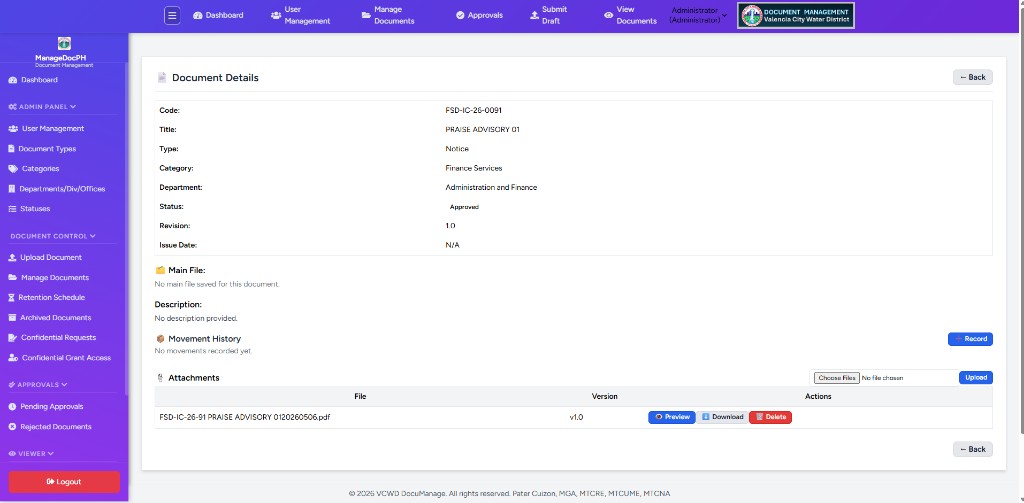
What you see on Document Details
| Section | Contents |
|---|---|
| Header | Document Details · ← Back · Approve/Reject (when status is Pending Approval and you are an approver) |
| Metadata table | Code, Title, Type, Category, Department, Status, Revision, Issue Date |
| Main File | Filename · Preview · Open/Download (if a main file exists) |
| Description | Full text description |
| Movement History | List of movements; Record (Administrator / Document Controller) to add a movement |
| Attachments | Upload new files; table of files with actions below |
Attachment actions (on Document Details)
| Button | Color | Action |
|---|---|---|
| Preview | Blue | Opens the file in a viewer modal (PDF/images inline; Office may use online viewer) |
| Download | Light blue | Downloads or opens the file (not shown for Contributor role) |
| Delete | Red | Removes that attachment (Administrator only; confirms first) |
Above the attachments table you may see Choose Files and blue Upload to add more files without leaving the page.
8.3 Archive confirmation
When you click red Archive (Manage Documents or Edit Document), the system asks:
Do you want to archive this document?
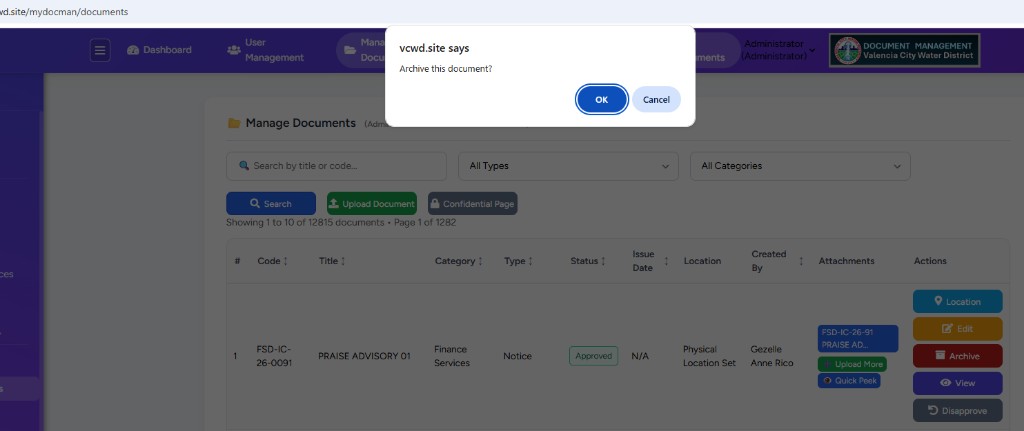
The dialog explains what happens:
- The document is hidden from normal lists (Manage Documents, Dashboard, etc.) — it is not permanently deleted.
- All uploaded files stay in the system.
- The record moves to Document Control → Archived Documents.
- An Administrator can Restore it to active lists later.
- The action is logged in the Activity Log.
| Button | Result |
|---|---|
| OK | Archive the document (soft delete) |
| Cancel | Nothing changes — document stays active |
Restore (on archived rows in Manage Documents) shows a similar message explaining that the document returns to normal lists. See 11 — Archived Documents to review all archived records.
8.4 Disapprove confirmation
On approved documents, grey Disapprove appears for Administrator or the user who created the document.
- Find an Approved document in Manage Documents.
- Click Disapprove (grey button in Actions).
- Read the confirmation — it asks Do you want to disapprove this document? and lists what happens.
- Click OK to return it to Pending Approval, or Cancel to leave it Approved.
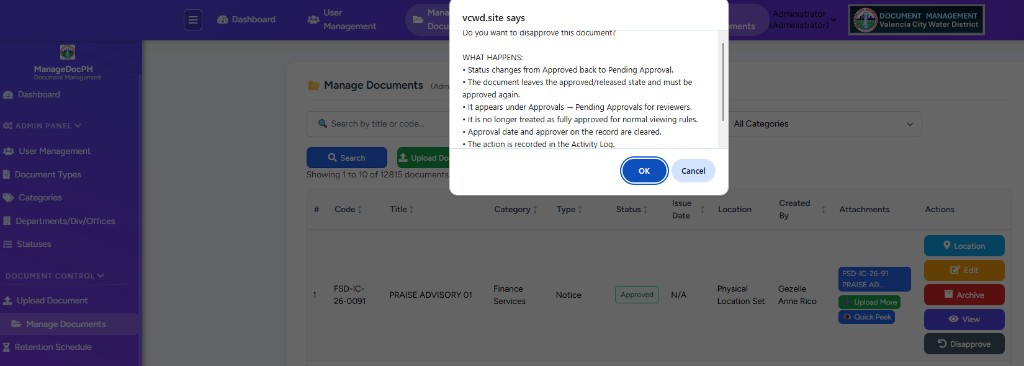
The dialog explains what happens:
- Status changes from Approved back to Pending Approval.
- The document leaves the approved/released state and must be approved again.
- It appears under Approvals → Pending Approvals for reviewers.
- It is no longer treated as fully approved for normal viewing rules.
- Approval date and approver on the record are cleared.
- The action is recorded in the Activity Log.
| Button | Result |
|---|---|
| OK | Return document to Pending Approval |
| Cancel | Stays Approved — no change |
9. Edit Document
Administrator only (active, non-archived rows). Click orange Edit in Actions, or open edit from the document View page when available.
URL pattern: /documents/{id}/edit
The edit screen is a single scrollable form (no tabs) — same style as Upload Document, optimized for phone, tablet, and PC.
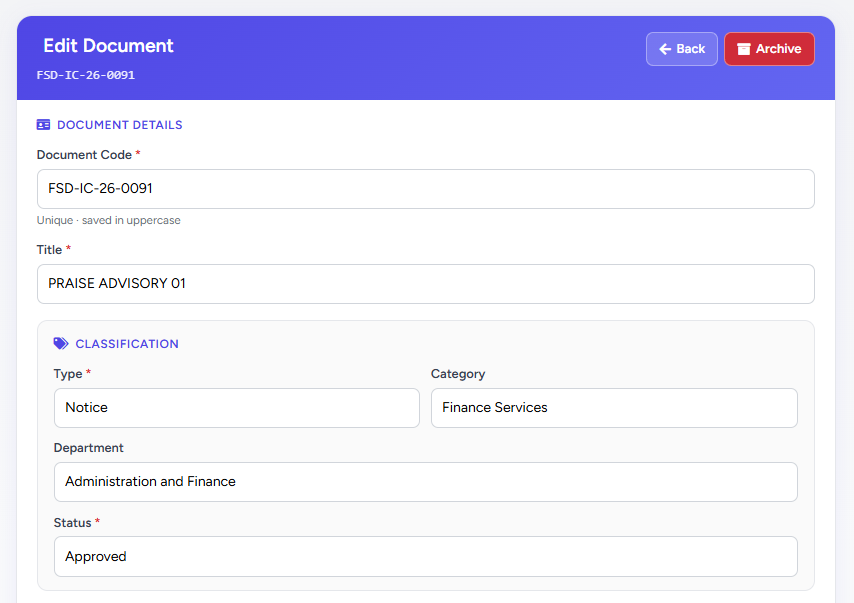
9.1 Header
| Element | Description |
|---|---|
| Edit Document | Page title with document code below (e.g. FSD-IC-26-0091) |
| Back | Returns to Manage Documents (keeps search/page when possible) |
| Archive | Red — soft-delete document (confirm dialog); same as list Archive |
9.2 Document details & classification
| Field | Required | Notes |
|---|---|---|
| Document Code | Yes | Unique; saved in uppercase |
| Title | Yes | Document title |
| Type | Yes | Document type dropdown |
| Category | No | Category dropdown |
| Department | No | Owning department |
| Status | Yes | Workflow status (e.g. Approved, Pending Approval) |
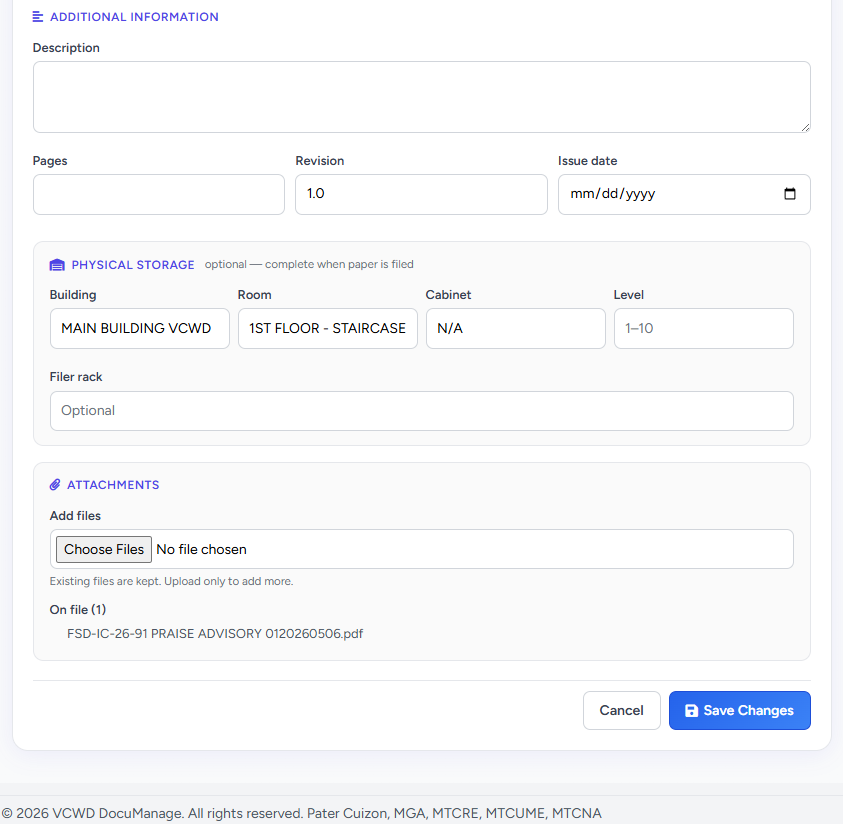
9.3 Additional information
- Description — summary or notes
- Pages — page count
- Revision — revision number (e.g. 1.0)
- Issue date — date picker
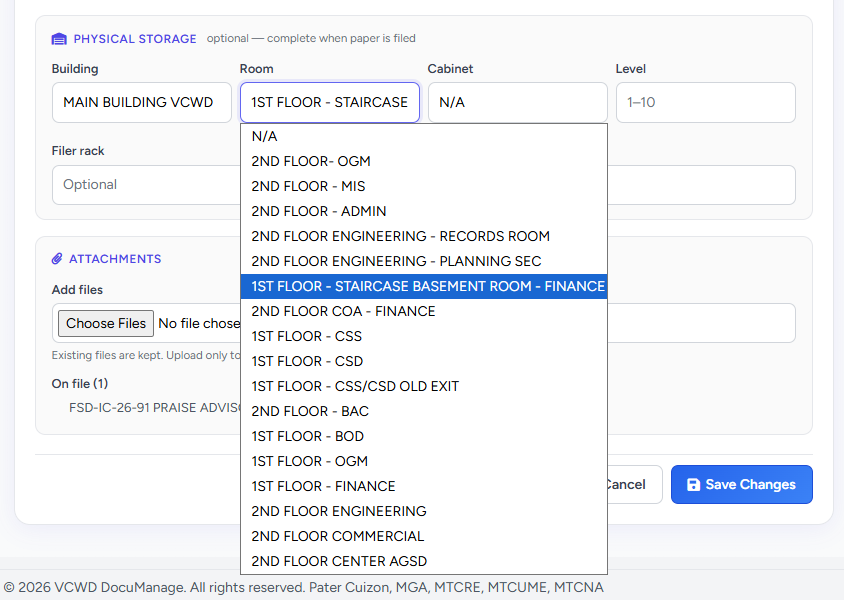
9.4 Physical storage
Same fields as upload: Building, Room, Cabinet, Level (1–10), Filer rack (optional). Label: optional — complete when paper is filed.
- Select Building first (e.g. MAIN BUILDING VCWD).
- Open Room — only rooms for that building appear (e.g. 1ST FLOOR - STAIRCASE BASEMENT ROOM - FINANCE).
- Select Cabinet after Room — cabinets for that room only.
- Enter Level (1–10) and optional Filer rack.
9.5 Attachments & save
- Add files — choose one or more files; existing files are kept
- On file (n) — lists current attachment names
- Cancel — return to Manage Documents without saving
- Save Changes (blue) — submits all edits; changes may appear in Activity Log
On mobile, Cancel and Save Changes stay fixed at the bottom for easy tapping.
10. Roles & visibility
- Administrator — broad access; admin view may include archived documents in the same list.
- Document Controller — typically all departments; manage and move per policy.
- Contributor — documents in allowed departments; upload and limited actions.
Users only see documents in departments they are allowed to access, unless they have all-departments access.
Confidential documents use a separate access workflow — see §12.
11. Mobile view
On narrow screens (phone/tablet), the wide table is replaced by document cards with the same key fields and actions in a grid. Use search and filters at the top before scrolling cards.
12. Confidential documents (Administrator)
Documents whose type is classified as confidential (type name contains Confidential, or type code such as CONF / CONFI) are not opened directly from Manage Documents until access is authorized. Use the confidential workflow below.
12.1 Open from Manage Documents
- On Manage Documents, click gray Confidential Page (next to Upload Document).
- Or use the sidebar: Confidential Requests or Confidential Grant Access.
- Use ← Back to Manage Documents to return to the main list.
URLs: /documents/confidential/requests (request) · /documents/confidential/grants (grant / use code)
12.2 Request Access Module
Full guide: Module 12 — Confidential Requests. Grant step: Module 13.
Title: Confidential Request Access — Submit request by uploading GM Memo/Board Resolution.
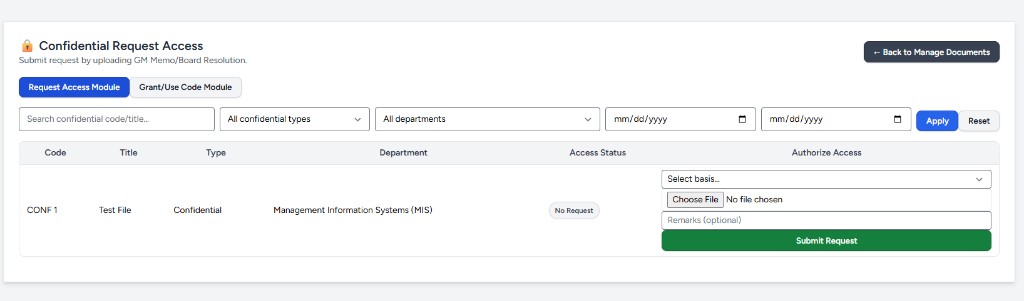
Two tabs at the top:
| Tab | Purpose |
|---|---|
| Request Access Module (blue when active) | Submit access requests with supporting file |
| Grant/Use Code Module | Generate code, enter code, open file — Module 13 · §12.3 |
Filters
| Control | Use |
|---|---|
| Search | Confidential document code or title |
| All confidential types | Limit to one document type |
| All departments | Limit to one department |
| Date from / to | Filter by document created date |
| Apply / Reset | Run or clear filters |
Table columns
| Column | Contents |
|---|---|
| Code | Document code (e.g. CONF 1) |
| Title | Document title |
| Type | Confidential document type |
| Department | Owning department |
| Access Status | Badge: No Request, Requested, Granted, Active, Expired |
| Authorize Access | Per-row request form (below) |
Submit a request (Authorize Access column)
- Find the confidential document in the table.
- Select basis… — GM Memo or Board Resolution.
- Choose File — upload proof (PDF, image, or Word; max 10 MB).
- Remarks (optional) — short note for the record.
- Click green Submit Request.
- Status changes to Requested; proceed to the Grant module to issue an access code.
12.3 Grant / Use Code Module
Switch to Grant/Use Code Module after submitting a request.
| Step | Action |
|---|---|
| 1 | Grant Access Code (green) — system generates a one-time access code (shown on screen). |
| 2 | Share or note the code, then enter it in Input access code. |
| 3 | Click Open Confidential File — opens the document viewer if the code is correct. |
| 4 | Active status shows remaining minutes. Access window is 30 minutes from first successful use. |
| 5 | Remove Access (red) — revokes access immediately; a new request is required. |
12.4 Setting up confidential types
Create or edit a document type under Document Types with Confidential in the name (or an approved confidential code). New uploads of that type appear in this confidential list.
Related documentation
- 08 — Upload Document
- 11 — Archived Documents
- 12 — Confidential Requests
- 13 — Confidential Grant Access
- 04 — Document Types (confidential classification)
- 02 — Dashboard (Documents Overview)
- Documentation index